Settings
You can customize Frazier at any time. To do so, open the document’s context menu and click on “Settings”.
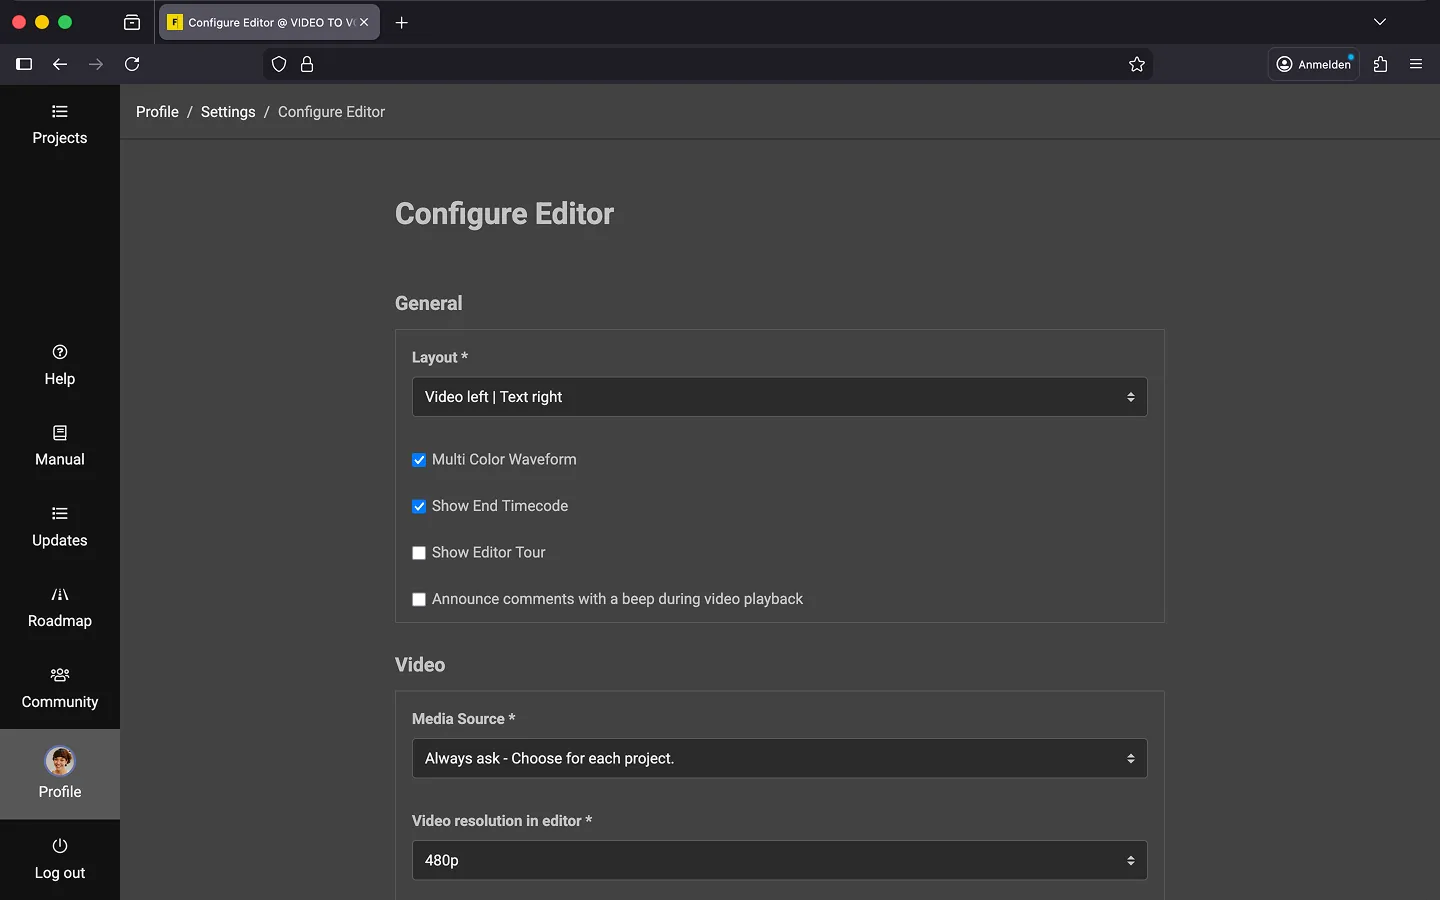
General Settings
General settings for the editor.
- Layout
- By default, the video is displayed on the left and the document on the right. You can swap these positions if needed.
- Multi-color Audio Visualization
- Are you working on a document with multiple voices (e.g., for reading subtitles aloud)? For a better overview, a different color can be displayed for each voice. This can get very colorful very quickly with many voices, which is why it is not activated by default. 😉
- Show end timecode in the document
- Display the end timecode in the inspector as well.
- Show Editor Tour
- Would you like to repeat the tour? Check this box and then open any document. Frazier will then guide you through the basic functions of the editor once more.
- Announce comments with a beep during video playback
- Activate this option if you are working with a screen reader.
Video
Video Settings for the editor.
- Media Source
- Define how you want to handle videos in general. Select “Server” if you always want to upload films, “Local Mode” if you want to work exclusively locally, or “Ask” to decide based on the situation and project.
- Video Resolution in the Editor
- Video playback depends on the speed of your internet connection. By default, a scaled-down version of the film is displayed in the editor to save bandwidth. If you have a very fast internet connection (>50 Mbit/s), you can increase the image quality. Note that this only applies to new projects, as the setting is applied during project initialization.
- Frame Rate for New Projects
- Set the default frame rate for the editor here.
- 23.98 fps (Cinema for TV/NTSC)
- 24.00 fps (Cinema)
- 25.00 fps (TV/PAL)
- 29.97 fps (TV/NTSC, Non-Drop Frame)
- 30.00 fps or 29.97 fps (TV/NTSC, Drop Frame)
- 50.00 fps (TV/PAL, HD)
- 59.94 fps (TV/NTSC, Non-Drop Frame)
- 60.00 fps or 59.94 fps (TV/NTSC, Drop Frame)
Text Editor
Settings for the text editor.
- Automatic focus for new text blocks
- For scripts with dialogue cues, you can determine which input field should be focused automatically when creating a new text block. Select “Dialogue cues / Instructions” if you regularly work with dialogue cues. Select “Text field / Description” if you only occasionally add dialogue cues and want to focus primarily on the description. This option has no effect on scripts without dialogue cues.
- Pasting behavior
- When pasting text, you can choose to “Keep formatting” or automatically “Remove formatting.” If you select “Keep formatting,” be careful when copying text from external sources into Frazier. If necessary, you can use “Ctrl” + “Shift” + “V” (Mac: “CMD” + “Shift” + “V”) to paste the copied text without formatting.
Command Palette
Set which key should be used to open the Command Palette.
Keyboard Shortcuts / Timeline
You can personalize the following keyboard shortcuts.
- Jump to the start of the video.
- Rewind to the previous text block.
- Rewind three seconds.
- Rewind one frame.
- Stop the video.
- Start the video.
- Fast forward one frame.
- Fast forward three seconds.
- Fast forward to the next text block.
- Jump to the end of the video.
- Decrease playback speed.
- Increase playback speed.
- Create a comment.
- Jump to timecode.
Missing a shortcut? Send us an email at support.
Please note that Frazier is a web application, and many key combinations are already reserved by the browser.
- “F1” = Help
- “F5” = Reload page
- “F11” = Fullscreen mode
- “Ctrl” + “F” = Search
- etc.
Other keys such as “Tab”, “Esc”, and “Enter” also have fixed assignments that cannot be reassigned. However, numbers, letters, special characters, as well as “F7”, “F8”, and “F9” work well for custom shortcuts.
Tip: You can also customize the editor layout and the color palette for the timeline. You can find details in the Configure Editor chapter.
Additional Settings
You can configure the following additional settings.
- “Picture-in-Picture” Mode
- You can undock the video to move it to a second monitor, for example.
- Mozilla Firefox
- When you hover the mouse over the video window, an icon appears in the bottom right corner of the video. Use this to start Picture-in-Picture mode.
- Google Chrome
- In the “Settings” (gear icon below the video), select the “Start Picture-in-Picture mode” option.
Tip: If you work with two monitors, we recommend using Firefox. Google Chrome limits the second window to 800x600px. This is a known bug that has existed for years but has not been fixed by Google.
- Change playback speed
- You can play the video at a different speed. Select the desired speed in the “Settings” (gear icon below the video player). Both the film and the voice output will be adjusted accordingly.
- Adjust volume balance
- Sometimes the original audio of the video is very loud. You can adjust the balance between the AD track and the original audio track. Use the slider next to the timecode in the video player.
- Easter Egg
- Click on the timecode next to the volume balance slider. The timecode will now reverse, showing you how much of the project you have already completed.
Last Update: 2026/01/23